What Makes Coffee Bitter, and How to Fix It in 2026
Bitter coffee is almost always over-extraction. Our 2026 guide names the 9 causes, ranks them by leverage, and gives the first fix for each brewer.
By the CoffeeGearGuides team · USA · Updated Jul 28, 2026 · 27 min read
On this page21
If you have wondered why your coffee tastes bitter, the answer is usually one word: over-extraction. Water has pulled more out of the grounds than the recipe intended, and the last things to dissolve are the harshest.
That single idea explains most bitter cups, but it is not the whole story. Stale beans, rancid oil in a basket, and hard water all produce their own kind of harshness that no recipe change will remove.
This guide separates those causes and puts them in the order that matters. We worked from published brewing standards, roast chemistry research, manufacturer guidance, and recurring owner troubleshooting reports.
Over-extraction, in one idea
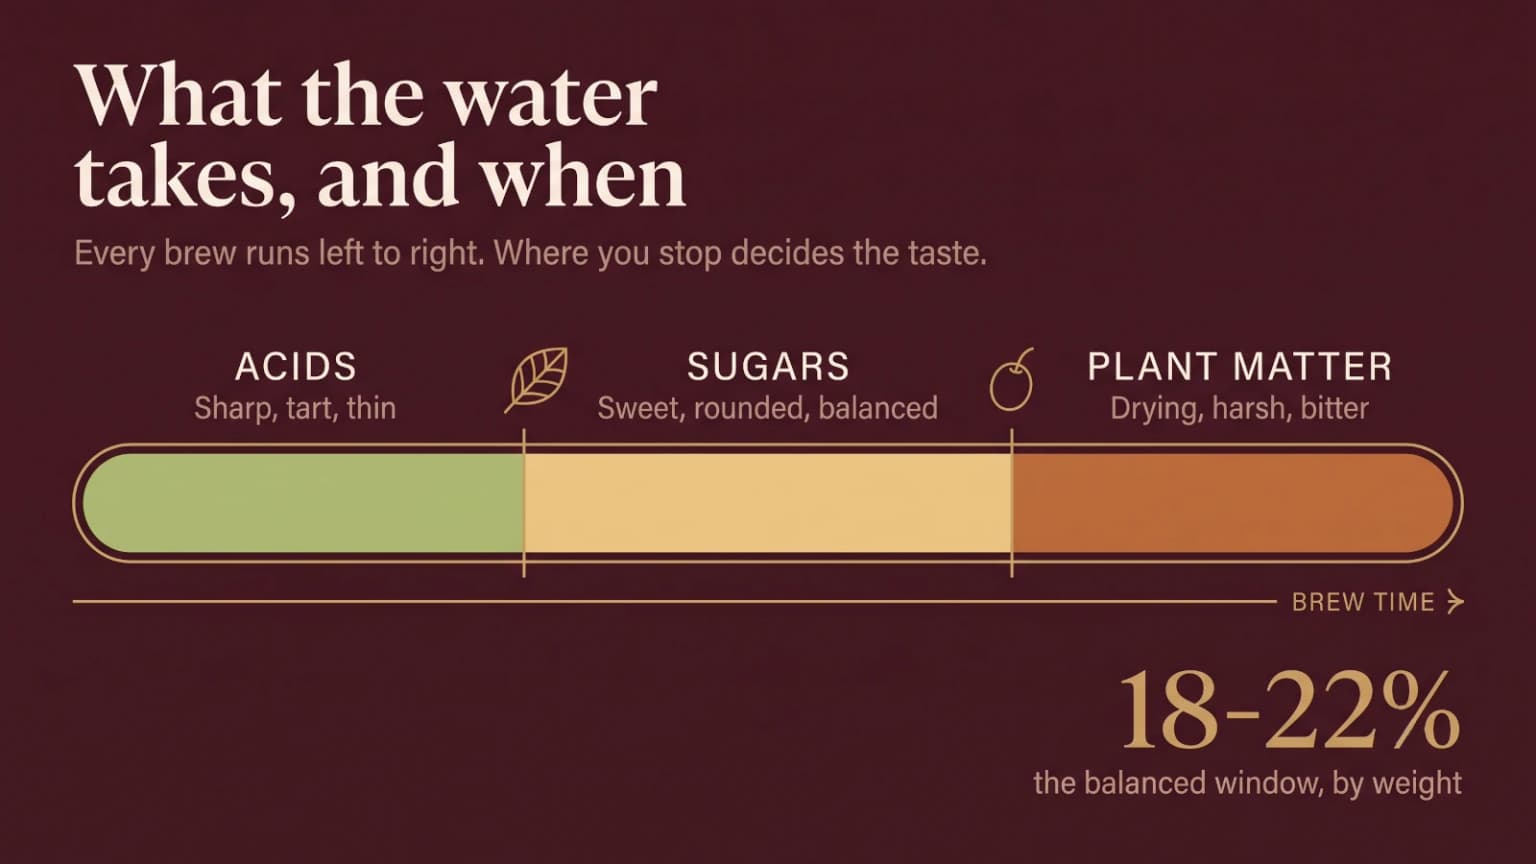
Brewing is a race between what dissolves quickly and what dissolves slowly. Water does not pull every compound out of coffee at the same speed, and the order is remarkably consistent.
Acids leave first, which is why a brew stopped too early tastes sharp and thin. Sugars and the compounds that read as sweetness and body follow, and this middle stretch is where a balanced cup lives.
Keep going and the water starts working on the plant material itself. That is where dry, harsh, drying bitterness comes from, along with the hollow finish that makes a cup feel thin despite tasting strong.
Nothing about bitterness is mysterious. It is the last thing to arrive, and every fix in this guide moves you back toward the middle.
The industry shorthand for how far you have gone is extraction yield, the percentage of the ground coffee that ends up dissolved in the cup. Specialty brewing standards generally target 18 to 22 percent.
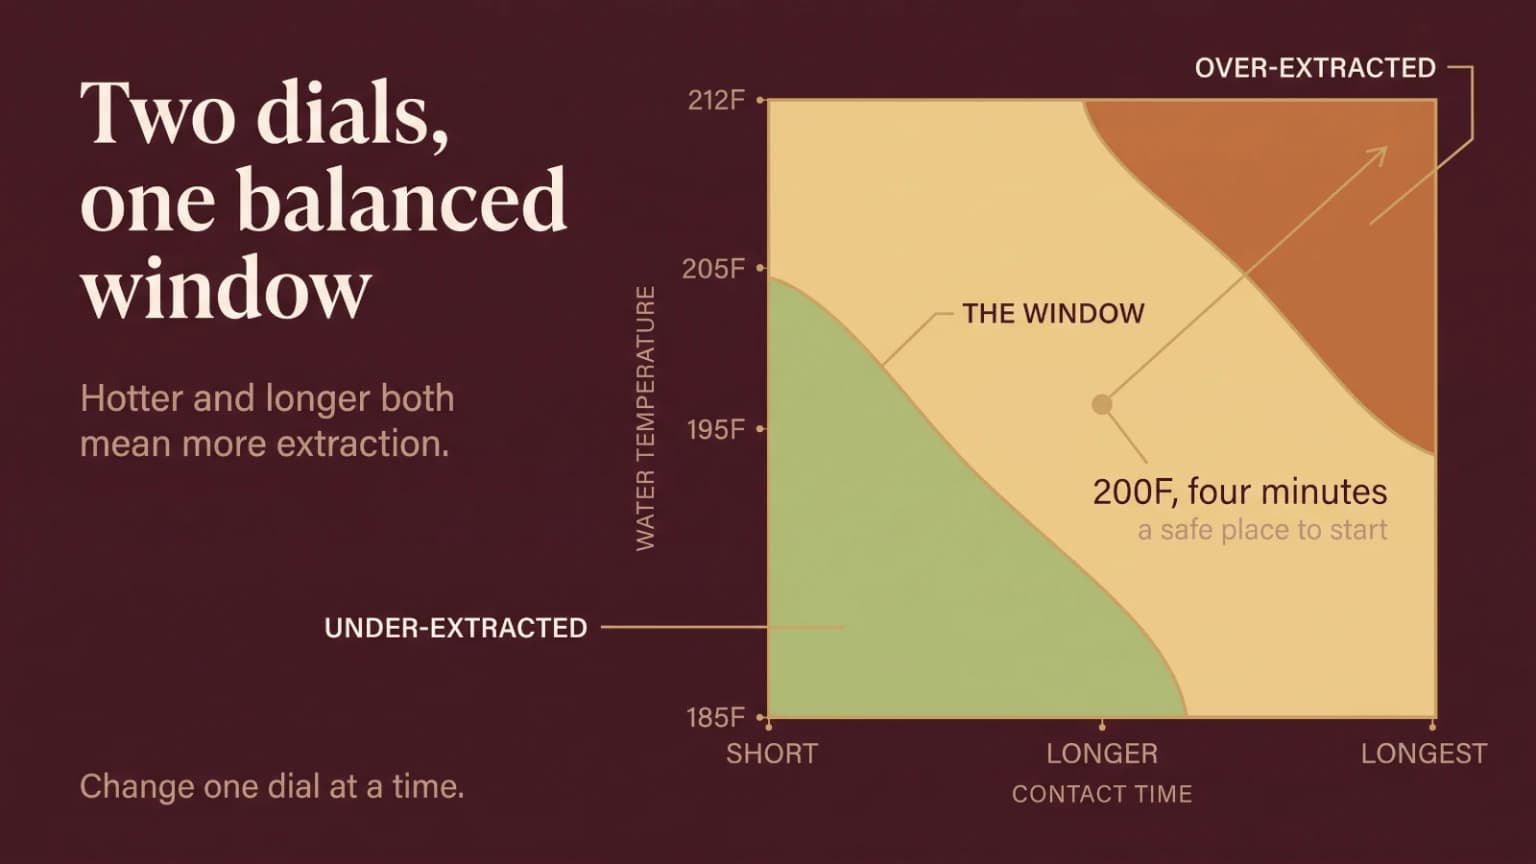
Below that window a cup reads sour and weak. Above it, bitterness and dryness take over, and the number climbs whenever grounds are finer, water is hotter, or contact lasts longer.
You do not need to measure any of this. You need to know which direction each change pushes you, because every fix below is either "extract less" or "stop extracting the wrong thing".
Bitter or sour? Tell them apart
Plenty of people fix the wrong problem because bitter and sour get used loosely in everyday speech. They are opposite failures, and the corrections point in opposite directions.
Bitterness is a drying, lingering harshness. It sits at the back of the tongue, it does not fade quickly, and it often comes with a sensation that your mouth has been stripped of moisture.
Sourness is sharp and immediate. It hits the sides of the tongue, it can taste salty or thin alongside the tartness, and it usually disappears fast rather than lingering.
What your cup is telling you
Less extractionMore extraction
Under-extracted
Sour
Tart · Salty · Thin · Sharp
The brew stopped before the sugars caught up with the acids.
Do this Grind finer, brew longer, or raise the water temperature.
Balanced
The target
Sweet · Rounded · Clear finish
Acids and sugars arrived together, and the water stopped before the plant material.
Do this Write down the grind, dose, and time so you can repeat it.
Over-extracted
Bitter
Drying · Harsh · Ashy · Hollow
Water kept working past the sugars and into the plant material.
Do this Grind coarser, brew for less time, or use cooler water.
Both failures are the same axis measured from opposite ends. Find your side first, because the corrections are exact opposites.
One cup can carry both at once, and that combination is the single most misread result in home brewing. It happens when a grinder produces a wide spread of particle sizes rather than a consistent one.
The smallest fragments give up everything they have long before the brew is over. The largest ones never finish.
Both end up in the same cup, so it tastes harsh and sharp together. Grinding coarser makes the sourness worse, and grinding finer makes the bitterness worse.
Read the cup, then act
Read the cup, then act
What you taste
What it usually means
First move
Drying and lingering
Classic over-extraction
Grind one step coarser
Ashy or burnt
Dark roast, or a scorched brewer
Lower the heat, check the roast
Harsh and sharp together
Uneven grind, both ends at once
Fix the grinder, not the recipe
Flat and dull, faintly bitter
Stale beans or stale water
Check the roast date
Bitter no matter the recipe
Old coffee oil or scale
Deep clean the whole path
Metallic and bitter
Water chemistry or an unseasoned pot
Change the water first
The words people use for bad coffee are imprecise, so match the sensation rather than the label. Lingering and drying is bitterness; sharp and quick is not.
Strong is not the same as bitter
A large share of complaints about bitter coffee are really complaints about strength. The two have different causes and different fixes, and confusing them sends people in the wrong direction.
Strength is how much dissolved coffee ends up in the cup, and the ratio of coffee to water sets it. Extraction is how much you pulled out of each particle, and grind, time, and temperature set that.
They are independent. You can brew a weak cup that is badly over-extracted, and a very strong cup that is extracted perfectly.
The practical test takes one sip. If the cup tastes intense but clean, with no drying finish, it is strong rather than bitter, and the fix is simply more water.
If it tastes harsh and leaves your mouth dry, it is over-extracted. Adding water dilutes that harshness without removing it, which is why watering down a bitter cup never quite works.
Ratio is the lever for strength alone. Something near 1:16 coffee to water by weight is a reasonable filter starting point, and moving to 1:17 or 1:18 lightens the cup without touching extraction.
Espresso works the same way at a smaller scale. A ratio near 1:2, meaning 18 grams of coffee producing about 36 grams in the cup, is a common place to start.
That scale hides a trap worth knowing. Running more water through the same coffee makes a drink weaker and more extracted at the same time, which is exactly how a long shot ends up thin and harsh together.
Milk complicates the reading, because it dilutes and masks at once. A cappuccino built on an over-extracted shot can taste acceptable while the same shot alone is undrinkable.
Taste the coffee on its own before adding anything. It is the only reliable way to know which of the two problems you are actually solving.
How we built this guide for 2026
CoffeeGearGuides is research-driven. We do not claim to have brewed a thousand bitter cups in a lab, and our about page sets out how we work.
For this guide that meant starting with published brewing standards, which is where the temperature ranges and extraction targets come from. Those documents describe what balanced coffee measures like, not what any one kitchen will taste.
Roast chemistry research supplied the second layer. It explains why a darker roast starts closer to the bitter edge, and why the bitterness of a stale bag does not respond to the fixes that work on a fresh one.
Manufacturer guidance filled in the equipment side. Cleaning intervals, descaling schedules, and recommended grind ranges come from the people who designed the brewers, and they are more specific than general advice.
Last came the pattern work. We read through recurring troubleshooting reports across owner forums and looked for the causes that keep resolving the problem, rather than the ones that get repeated most often.
That ordering matters, because popular advice and effective advice are not the same list. Water temperature gets far more attention online than grind consistency, and grind consistency fixes more cups.
9 causes of bitter coffee, ranked
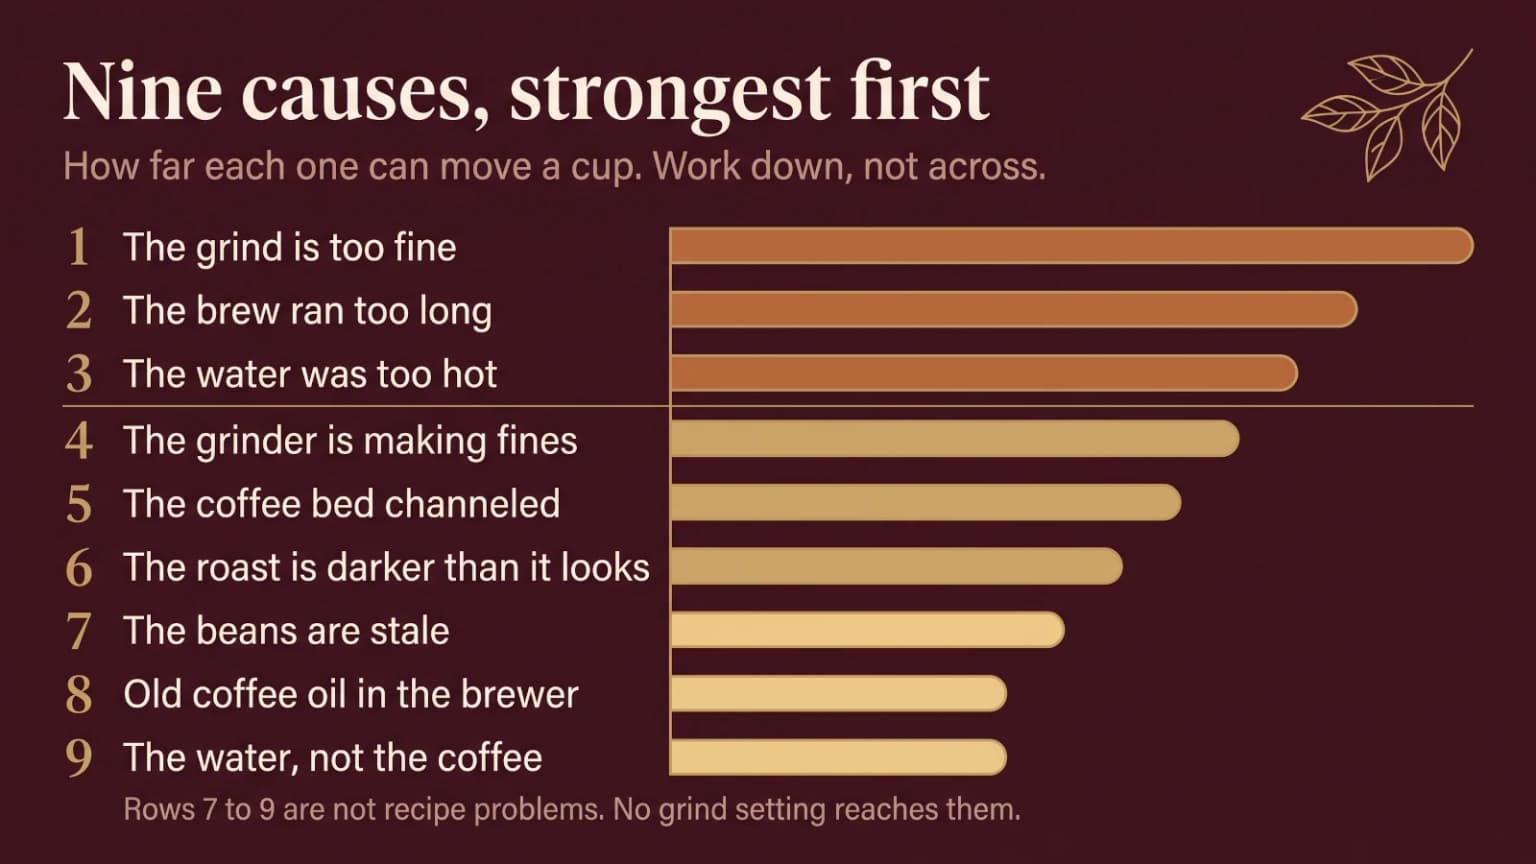
The list below is ordered by how far each cause can move a cup, based on how consistently it resolves the problem in the evidence we read. It is our ordering, not a measurement.
Work down it in order. The first three fix most bitter coffee and cost nothing, and the later ones matter most when recipe changes have already failed.
Start at the top. Most people start at water temperature, which sits third, and give up before reaching the grinder.
1. The grind is too fine
Grind size is the strongest lever in brewing because it changes two things at once. Finer particles expose far more surface area to the water, and they also pack tighter, which slows the water down.
More surface area and more contact time push the same direction. That is why a grind adjustment moves a cup further than any other free change you can make.
The symptom is usually specific to the brewer. Drip machines overflow the basket or drain slowly, pour-overs stall with water sitting on top, and espresso runs long and tastes like burnt toast.
The fix is one step coarser, then taste. Resist the urge to jump five settings, because you will overshoot into sourness and conclude that grind was not the problem.
Cheap grinders make this harder than it should be. A stepped grinder with coarse increments can jump straight past the setting you want, and a grinder whose adjustment collar loosens in use will drift finer over weeks without anyone noticing.
If your grinder cannot hold a setting, no recipe will save you. A burr grinder that returns to the same position makes every other fix here repeatable, and our single dose grinder guide covers the ones that do.
2. The brew ran too long
Contact time is the second lever, and it is the one people forget they are still controlling after the brew "finishes". A French press with the plunger down is still brewing until you pour it out.
Every method has a rough window. Espresso runs about 25 to 30 seconds for a double, pour-over three to four minutes, AeroPress one to two, French press near four, and cold brew over 12 to 24 hours.
Going past those windows extracts further along the curve. A French press left standing for fifteen minutes while you make breakfast produces exactly the drying harshness this guide is about. It is worse in an insulated French press, where the heat driving that extraction never falls away.
Drip machines hide a version of this. Coffee dripping onto a hotplate keeps cooking after the cycle ends, and the flavor of a pot that has sat for an hour is not the flavor it had when it finished.
The fix is to decant. Pour a French press out completely as soon as the timer ends, and move drip coffee off the plate into an insulated carafe rather than letting it stew.
If your pour-over regularly runs long, the cause is usually upstream. A slow drawdown means the grind is too fine or the bed has compacted, so fix the grind rather than trying to pour faster.
3. The water was too hot
Brewing guidance centers on roughly 195F to 205F. Water at a rolling boil is 212F at sea level, which is above that range and extracts noticeably faster.
Pouring straight from a boiling kettle is one of the most common home brewing habits and one of the easiest to correct. Taking the kettle off the heat for about thirty seconds usually brings it inside the window.
Altitude shifts this. Water boils lower as elevation rises, so a Denver kitchen boils around 202F and is already close to the target without waiting.
Dark roasts are more sensitive than light ones. Their cell structure has been broken down further by roasting, so they give up their soluble material faster and reach bitterness sooner at the same temperature.
That is the practical rule worth remembering. Lighter roasts want the hot end of the range, darker roasts want the cool end, and using one temperature for every bag guarantees that some of them taste harsh.
Brewers with no temperature control are not a lost cause. You cannot change what the machine does, so use grind and contact time instead, and treat the water as a fixed part of the recipe.
4. Your grinder is making fines
Fines are the dust-sized fragments a grinder produces alongside the particles you actually wanted. Every grinder makes some, and the amount depends on burr design far more than on price.
Fines matter because size drives extraction speed. A fragment a fraction of the size of the surrounding grounds gives up everything it has almost immediately, then keeps contributing harshness for the rest of the brew.
Blade grinders are the worst case, because they do not cut to a size at all. They smash beans until you stop, which produces dust and boulders in the same batch and makes a genuinely balanced cup impossible.
This is the cause behind the harsh-and-sharp cup described earlier. When both failures show up together, adjusting the grind setting cannot fix it, because the problem is the spread of sizes rather than the average.
Burr geometry is what changes the spread. Two grinders set to the same nominal size can taste different, and our Comandante C40 and 1Zpresso K-Ultra comparison weighs what that is worth in the cup.
There is a crude test if you suspect fines. Rinse a spoonful of grounds through a fine mesh sieve and look at how much dust comes through, and if a meaningful share of the batch passes, the grinder is the thing to fix.
5. The coffee bed channeled
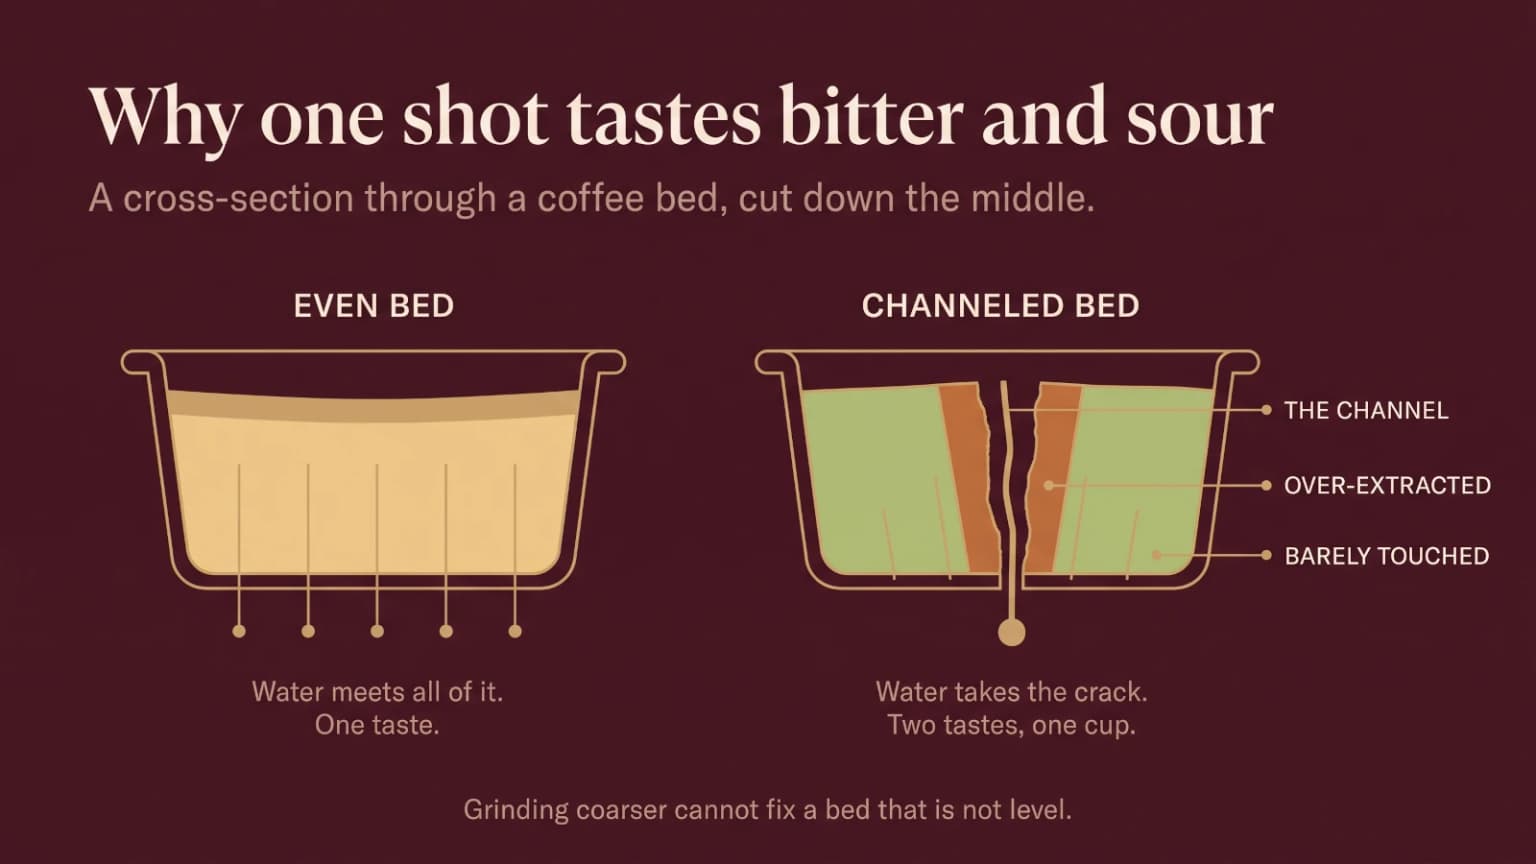
Channeling is water finding a path of least resistance through the grounds instead of moving through them evenly. Part of the bed gets far more water than it should while the rest is barely touched.
The result is over-extraction and under-extraction happening in the same brew, in the same seconds. The channel over-extracts and delivers bitterness, and the neglected regions contribute the sourness underneath it.
Espresso shows this most dramatically because the pressure is high and the margin is small. A shot that sprays, splits into separate streams, or runs fast and still tastes harsh is usually channeling rather than badly ground.
Pour-over channels too, just more quietly. Pouring hard into one spot digs a crater, and water running down the filter wall bypasses the coffee entirely.
The fixes are about the bed, not the recipe. Distribute the grounds level before brewing, tamp flat rather than hard, and pour in gentle circles that keep the surface even.
Uneven beds also form on their own. A brewer whose spray head only wets the middle of the basket leaves the outer ring under-extracted, which is one of the differences that separates a well-designed drip machine from a cheap one.
6. The roast is darker than it looks
Roast level sets the floor for how bitter a coffee can be, and no brewing adjustment moves that floor. Roasting breaks the bean's chlorogenic acids down into chlorogenic acid lactones, and pushing further converts those into phenylindanes.
Those two groups taste different. Lactones give the softer, coffee-like bitterness of a medium roast, while phenylindanes carry the harsh, lingering kind that builds as a roast goes darker.
Roast names are unreliable. One roaster's medium is another's dark, and the label on the bag is a marketing decision rather than a measurement.
Look at the beans instead. A visible sheen of oil on the surface means the roast went far enough for oils to migrate outward, which is the clearest signal available without equipment.
Dark roasts are not a mistake. They are the traditional base for espresso and for milk drinks, where the added intensity survives being diluted, and plenty of people prefer them.
The difference is where they start on the extraction curve. A dark roast begins closer to the bitter edge, so the same recipe that suits a light roast will push it over.
Where each roast starts
Where each roast starts
Roast level
How it looks
Bitterness risk
Adjust by
Light
Dry, matte, pale brown
Low, sours first
Hotter water, finer grind
Medium
Dry, even mid brown
Balanced either way
Standard recipes work
Medium dark
Faint sheen at the edges
Moderate
Drop a few degrees
Dark
Visibly oily, near black
High, bitters first
Cooler water, coarser grind
Roast level changes where a coffee sits on the extraction curve before you brew it. Adjust the recipe to the bag rather than using one recipe for everything.
Oily beans cause a second problem in machines that grind for you. The oil coats the chute, collects the next batch of grounds, and turns rancid. That is why our guide to beans for superautomatic machines avoids the darkest roasts.
7. The beans are stale
Stale coffee has its own bitterness, and it is worth learning to recognize because the recipe fixes do not touch it. It reads as flat and dull, with a cardboard or papery quality behind the harshness.
Freshly roasted coffee degasses, releasing carbon dioxide for days. That gas shields the aromatics underneath, and as it escapes oxygen replaces it, which is the whole job of a sealed coffee container.
Ground coffee runs this clock far faster. The surface area that helps water extract also helps oxygen, which is why pre-ground coffee tastes noticeably duller than the same beans ground that morning.
Look for a roast date, not a best-before date. A best-before date is set by the packer and can sit a year out, while a roast date tells you what you actually need to know.
Most whole bean coffee is at its best from a few days after roasting to about a month. It does not become undrinkable after that, but the sweetness that balances bitterness fades first.
Storage is simpler than the internet suggests. An opaque, airtight container at room temperature covers it, the freezer works for long-term storage of unopened bags, and the fridge is the one place to avoid because it cycles moisture through the beans.
8. Old coffee oil in the brewer
This is the cause that survives every recipe change, and it is the reason some people conclude their machine is broken. Coffee oil left on equipment goes rancid, and rancid oil tastes bitter in a way no grind adjustment will remove.
The giveaway is consistency. If every brew tastes harsh regardless of beans, grind, and temperature, the problem is on the equipment rather than in the recipe.
Every surface the coffee touches collects it. Baskets, showerheads, carafes, plungers, mesh filters, and the grinder's burr chamber all build up a film that a rinse under the tap does not remove.
Reusable mesh filters are the worst offenders. The mesh holds oil in places a sponge cannot reach, and a filter that looks clean when dry can still ruin a cup.
Scale is the other half of this. Mineral deposits inside a heated brewer change how it heats and how water moves through it, and manufacturers publish descaling intervals for exactly this reason.
If a deep clean has never happened, do it before you change anything else in your routine. It is the one fix that can make every other adjustment you have already tried start working.
9. It is the water, not the coffee
Brewed coffee is overwhelmingly water, so the water is an ingredient rather than a solvent. Two kitchens using identical beans, grinders, and recipes can produce different cups on this alone.
Two properties matter. Total dissolved solids describe how much mineral content the water carries, and alkalinity describes how strongly it resists changes in acidity.
Specialty water guidance centers on roughly 150 mg/L of total dissolved solids with modest alkalinity. Water far above that extracts differently, and high alkalinity buffers the acids that would otherwise balance the cup.
That buffering is why hard water so often reads as harsh. The brightness that should offset bitterness is chemically flattened before it reaches your tongue, leaving the harsh end exposed.
Softened water is a specific trap. Ion exchange softeners replace calcium with sodium, which removes scale but leaves high alkalinity in place and can make coffee taste both flat and salty.
What your water is doing
What your water is doing
Your water
Effect on the cup
What to do
Hard, high mineral
Flattens acidity, reads harsh
Filter, or use bottled spring water
Softened by ion exchange
Flat and faintly salty
Filter separately for the kitchen tap
Distilled or reverse osmosis
Hollow and thin, not bitter
Add minerals back, never brew with it neat
Heavily chlorinated
Chemical harshness over everything
Carbon filter, or leave it to stand
Filtered, moderate mineral
The target
Change the filter on schedule
Water is the most overlooked cause here, and the only one that affects every brewer in the house at once. It is last on the list because it is rarely the sole problem.
Where bitterness starts by brewer
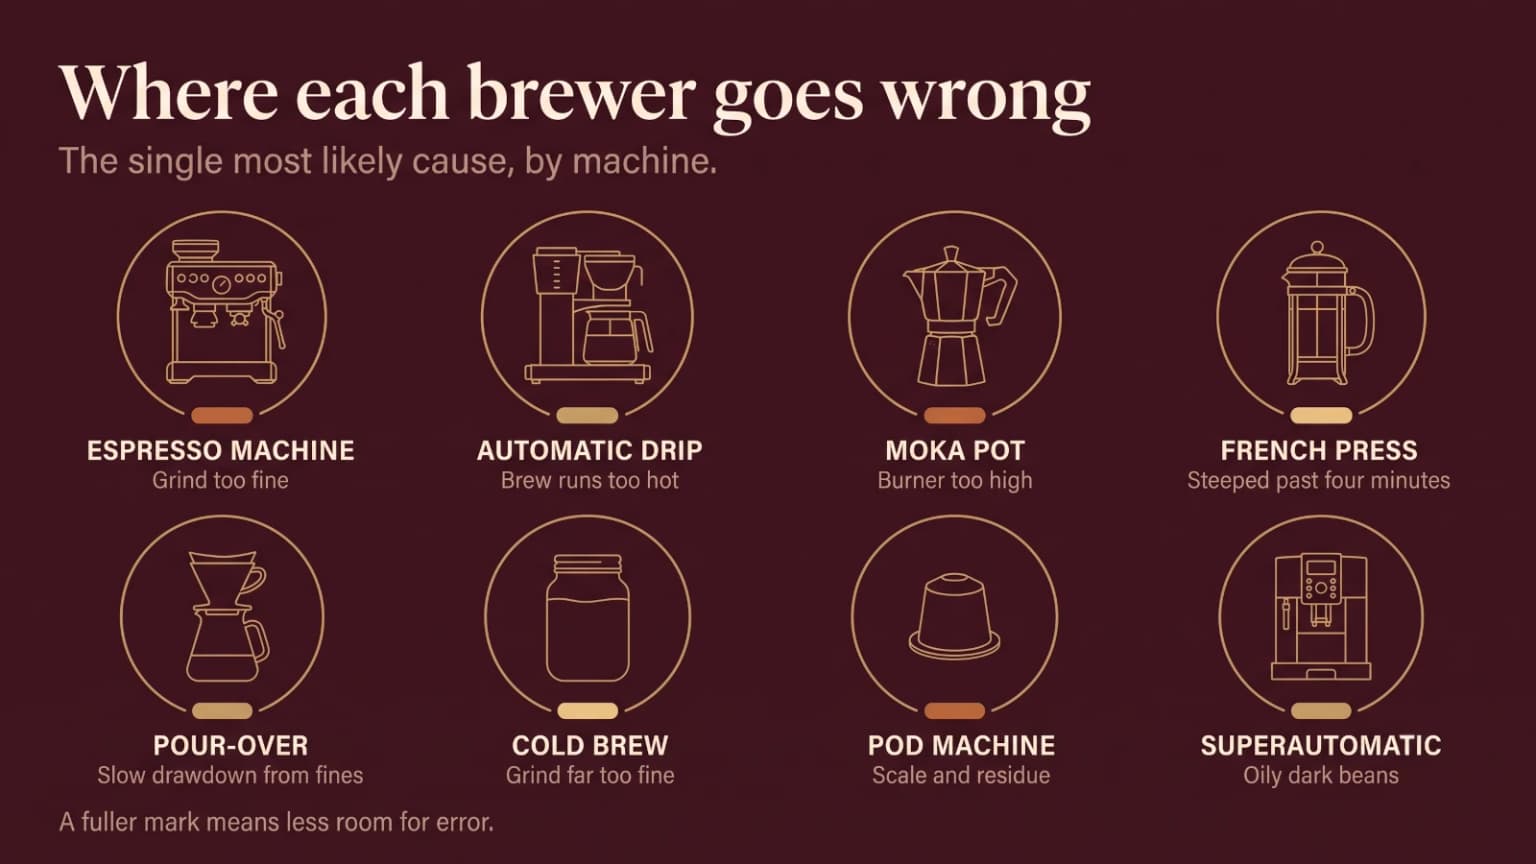
Every brewing method has a characteristic failure, because each one locks down different variables. Knowing which lever your brewer leaves you is faster than working through all nine causes.
Each brewer fails its own way. Find yours before working through a general checklist.
Automatic drip machines have a temperature problem more often than a grind problem. A cheap brewer that runs hot, or one that dribbles water onto a narrow patch of the bed, will produce bitterness that no grind setting fixes.
This is the reasoning behind independently tested brewers. Certification programs measure brew temperature and contact time against a defined standard, and our guide to SCA certified coffee makers explains what that covers.
Moka pots fail on heat. The design sits directly on a burner, so a high flame drives water through violently and scorches the coffee against hot metal, which produces that distinctive burnt bitterness people associate with the pot.
Moderate heat and a pre-heated water charge solve most of it. Taking the pot off the burner at the first gurgle stops the harshest fraction being pushed through, and our induction moka pot guide covers the rest.
French press is a contact time problem. Nothing stops the brew when the timer ends except you, so the fix is to pour the whole thing out at the steep time your roast wants rather than leaving it on the counter.
The sediment left in the mug keeps extracting too, which is why grind quality shows up faster here than in any paper brewer. Our guide to grinders for French press covers which ones keep that silt out of the cup.
Cold brew rarely tastes bitter from over-extraction, because cold water extracts slowly and selectively. When it does turn harsh, the cause is usually a grind that was far too fine for a steep measured in hours.
Pod machines are the awkward case, because Keurig and Nespresso systems fix the grind, the dose and the contact time for you. Every lever this guide leans on is sealed inside the capsule, unless you own a dual coffee maker with a grounds basket.
That leaves the water and the machine. Descale on schedule, run a plain water cycle first thing, and pick a shorter volume setting, since pulling extra water through one capsule drags it further into the bitter range.
The first thing to check on each brewer
The first thing to check on each brewer
Brewer
Most likely cause
First change to make
Automatic drip
Brew temperature or spray pattern
Decant off the hotplate, then grind coarser
Espresso
Grind too fine, or channeling
Coarsen until the shot runs to time
Moka pot
Burner too high
Halve the heat, pull it off at the gurgle
French press
Steeped past four minutes
Decant the whole pot on the timer
Pour-over
Slow drawdown from fines
Grind coarser, pour gently in circles
Cold brew
Grind far too fine for the steep
Go coarse and cut the steep to 14 hours
Pod machine
Scale and residue
Descale, then choose a shorter volume
Superautomatic
Oily dark beans in the grinder
Switch to a drier roast, clean the chute
Each brewer locks down different variables, so the useful starting point differs. Work the row for your machine before working the full list.
Milk deserves a mention here, because it is the most common way bitterness gets managed rather than fixed. Fat and protein coat the tongue and physically blunt the perception of harsh compounds.
That is legitimate for a latte, where the drink is designed around it. A shot that only tastes good under milk is still an over-extracted shot. Our oat milk frother guide and our latte art machine guide cover the texture side of those drinks.
When espresso is the bitter one
Espresso deserves separate treatment because it fails faster and more visibly than any other method. Nine bars of pressure through a compressed bed leaves very little margin for error.
The first diagnostic is the clock, not the tongue. A double shot that should run 25 to 30 seconds and instead takes 45 has been in contact with water far too long, and it will taste bitter regardless of the beans.
A slow shot means the grind is too fine, the dose is too high, or the tamp has compacted the bed past what the pressure can push through. Coarsen first, because it is the change with the largest effect.
A channel over-extracts one path and starves the rest. The cup carries both failures at once, which is why it resists recipe changes.
The harder case is a shot that runs to time and still tastes harsh. That points at channeling, and the clues are visual: streams that split apart, spraying from the spouts, or a puck with a hole worn through it.
Fix the bed rather than the recipe. Break up clumps, level the grounds before tamping, tamp flat rather than hard, and check that the portafilter basket is not overfilled enough to touch the shower screen.
Machine temperature is the third suspect. A boiler that has not stabilized runs hot on the first shot of the day, which is why pulling a blank shot through the group before the real one is standard practice.
Grinder quality bites hardest here. Espresso needs adjustment fine enough to move a shot by a few seconds, and our guide to espresso machines with built-in grinders covers which ones offer that resolution.
The case for a little bitterness
Chasing bitterness to zero is its own mistake, and it produces a cup most people do not enjoy. Bitterness is a structural component of coffee, not a defect to be eliminated.
A brew with no bitterness at all is usually under-extracted. It tastes thin and sour, the finish disappears immediately, and the sweetness people are actually chasing never arrives because it sits further along the same curve.
The goal is balance rather than absence. Pleasant bitterness is the dark chocolate and toasted quality that gives coffee its backbone, and it resolves cleanly instead of drying your mouth out.
There is a second point worth making. Caffeine contributes only a small share of coffee's bitterness, so switching to decaf to escape a harsh cup usually disappoints.
Some of the harshest brewing traditions are deliberate. Very dark espresso roasts, moka pot coffee, and Turkish coffee all carry bitterness on purpose, and correcting them into a light, tea-like cup means brewing something other than what they are.
Fix it in fifteen minutes
This is the working order for the next cup, assuming your equipment is clean. If it has not been cleaned in months, do that first, because otherwise every result below is contaminated.
Temperature and time push the same direction. Two small changes in the same direction land further than either one alone.
The bitterness fix, in order
1
Fix the dose and write it down
Weigh the coffee and the water once, and keep both constant while you work. Everything below is meaningless if the strength moves at the same time.
Tip A ratio near 1:16 by weight is a sane starting point for filter coffee.
2
Grind one step coarser
One step, not five. Brew, taste, and note whether the harshness dropped, stayed, or turned into sourness.
Watch out If it turned sour, you have passed the balance point. Go back half a step.
3
Cut the contact time
Shorten the steep or stop the pour sooner, by about 30 seconds for filter methods. Decant immediately either way.
4
Take the water off the boil
Wait about thirty seconds after boiling before pouring. Do this only after grind and time have been tried, because it is the smaller lever.
Tip Darker roasts benefit most from cooler water, so start here if the beans look oily.
5
Check the roast date
If none of the above moved the cup, look at the bag. Coffee more than a couple of months past roasting has a dullness no recipe recovers.
6
Change the water
Brew one cup with bottled spring water, keeping everything else identical. If that cup tastes clean, your tap water is the cause.
Watch out Never brew with distilled or reverse osmosis water alone. It extracts poorly and tastes hollow.
Each step is a test as much as a fix, so keep notes for the first few days. Two lines per brew is enough to turn guesswork into a recipe you can repeat.
The clean that fixes stale bitterness
If bitterness survives every recipe change, this is the section that matters. Rancid oil and scale are not recipe problems and will not respond to recipe solutions.
The deep clean, once
1
Strip the brew path
Remove the basket, filter holder, showerhead, plunger, or mesh screen. Anything the coffee touches comes apart as far as the manual allows.
2
Soak, do not scrub
Use a dedicated coffee equipment cleaner and follow its dilution. Detergent leaves residue with its own taste, and scrubbing will not reach mesh anyway.
Tip Mesh filters and plunger assemblies need the longest soak. They hold the most oil.
3
Clean the grinder
Brush out the burr chamber and the chute. Grinder cleaning tablets handle the oil film that a brush cannot reach, especially with oily dark roasts.
Watch out Never put water in a grinder. Brush and tablets only.
4
Descale the machine
Follow the interval and solution in your manual. Scale changes how a heated brewer holds temperature, which changes extraction before any coffee is involved.
Tip Hard water areas need this two to three times more often than the manual assumes.
5
Rinse until it runs clean
Run at least two full water cycles afterwards, and discard them. Cleaning solution left in the path tastes worse than what you removed.
Set an interval once and stop thinking about it. Baskets and plungers want a proper clean weekly, grinders monthly with oily beans, and descaling on whatever schedule your water hardness demands.
What to change first in 2026
If you take one thing from this guide, make it the order. Grind, then time, then temperature, then the things a recipe cannot fix.
That order is not arbitrary. The first three are free, reversible, and immediate, and they resolve the majority of bitter cups without anyone buying anything.
When those three fail, stop adjusting the recipe. A cup that stays harsh across every setting is telling you the problem is the beans, the equipment, or the water, and continuing to fiddle with the grind will only add frustration.
The most common permanent fix, for people who have already tried everything, is a grinder that holds its setting and produces a narrow range of particle sizes. It is the piece of equipment that makes every other variable measurable.
Brewing well is not a talent. It is a short list of variables, adjusted in a sensible order, with a note taken each time so you never have to solve the same cup twice.
Frequently asked questions
Why does my coffee taste bitter all of a sudden?
A sudden change points at something that changed recently. The usual candidates are a new bag of beans, a bag that has been open for three weeks, or a grinder that has drifted finer as its adjustment loosened.
Equipment is the other common answer. Old coffee oil builds up slowly until one morning the cup tastes harsh no matter what recipe you use.
Work backwards from the last thing that changed rather than rebuilding your whole recipe. One change, one taste, then decide.
Is bitter coffee over-extracted or under-extracted?
Bitter coffee is over-extracted. Water has dissolved past the sugars and into the plant material, which brings harsh, drying compounds with it.
Sour coffee is the opposite problem. The brew stopped before the sugars had time to balance the acids that come out first.
A cup can be both at once when the grind is uneven. Fine particles over-extract while coarse ones under-extract, and the result tastes sharp and harsh in the same sip.
How do I make bitter coffee less bitter without new beans?
Grind one step coarser and taste again. Grind size moves extraction more than anything else you can change for free, and coarser grounds slow the water down.
If that is not enough, take the water off the boil for thirty seconds before pouring, or cut the contact time. Shorten a French press steep to three minutes, or stop a pour-over sooner.
Change one of these at a time. Two changes at once tell you nothing about which one worked.
Does adding salt to coffee fix bitterness?
A small pinch of salt does reduce perceived bitterness. Sodium suppresses bitter taste receptors, so the harshness reads as milder without anything being removed from the cup.
It is a rescue, not a repair. The over-extracted compounds are still there, and so is whatever caused them.
Use it on a cup you have already brewed, then fix the grind, time, or temperature before the next one.
What water temperature stops coffee tasting bitter?
Most brewing guidance centers on roughly 195F to 205F. Water at a full boil sits at 212F at sea level, which is above that window and extracts faster than most recipes expect.
Taking a kettle off the heat for about thirty seconds usually lands inside the range. A brewer with no temperature control gives you contact time and grind instead.
Temperature matters less than grind, so treat it as the second thing you adjust rather than the first.
Why does my Keurig or pod coffee taste bitter?
Pod machines fix the grind, the dose, and the contact time, so the levers most people reach for are already locked. That leaves the water and the machine itself.
Descale on the schedule in the manual and run a plain water cycle before the first drink of the day. Scale and old residue are the most common causes in a sealed system.
Choosing a shorter volume setting also helps. Pulling more water through the same capsule extracts further into the bitter range.